What Are Virtual Keys?
Portkey’s virtual key system lets you use one Portkey API key to connect to Portkey’s gateway, which internally uses your provider credentials to connect to multiple AI providers and models. This is the core concept that makes AI gateways powerful:- One API key (Portkey’s) → connects to multiple providers (OpenAI, Anthropic, etc.) → accesses hundreds of models
- No need to manage separate API keys for each provider in your code
- Centralized credential management and governance
The Virtual Keys feature has evolved into the Model Catalog system, which provides better governance, centralized management, and model-level controls. The core concept remains the same - one key, many providers.Learn more about Model Catalog →
How It Works: Portkey API Key → Gateway → Provider Credentials
Portkey uses a two-layer authentication system:1. Portkey API Key (Your Virtual Key)
Your Portkey API Key is your virtual key - it’s the single key you use to authenticate with Portkey’s gateway. This key gives you access to all providers and models configured in your account. Where to get it:- Go to Settings → API Keys
- Create a new API key with appropriate permissions
- Use it in the
x-portkey-api-keyheader orPORTKEY_API_KEYenvironment variable
- Authenticates requests to Portkey’s gateway
- Controls access to Portkey features (completions, prompts, configs, guardrails)
- Manages permissions (read/write/delete for different features)
- Tracks usage and analytics
2. Provider Credentials (Stored Securely in Model Catalog)
Your provider credentials (OpenAI API key, Anthropic API key, etc.) are stored securely in Portkey’s Model Catalog. The gateway uses these credentials internally - you never expose them in your code. How it works:- Store provider credentials once in Model Catalog (creates an Integration)
- Share with workspaces (becomes an AI Provider)
- Use provider slug in code:
@provider-slug/model-name - Gateway automatically uses the stored credentials when you make requests
- Credentials encrypted in secure vaults
- Decrypted only in isolated workers during requests
- Never exposed in logs, responses, or UI
- Cannot be reverse-engineered from provider slugs
Model Catalog
Learn how to set up providers and manage credentials in Model Catalog
How Model Catalog Works
Model Catalog organizes AI access in a three-level hierarchy:Credentials → Providers → Models
1. Integrations (Organization Level)- Where credentials are stored
- Created by org admins
- Can be shared with multiple workspaces
- Set default budgets, rate limits, and model allow-lists
- What workspaces see and use
- Inherit from org-level Integrations or workspace-only
- Workspace-specific budgets and rate limits
- Represented by slugs like
@openai-prod
- Individual AI models you can call
- Format:
@provider-slug/model-name(e.g.,@openai-prod/gpt-4o) - Access controlled by model provisioning
Quick Start: Add a provider in Model Catalog → AI Providers → Add Provider. Choose existing credentials or create new ones for just your workspace.
Manage Credentials
For org admins: Learn how to centrally manage credentials and share them across workspaces
How Credential Storage Works
Portkey stores your provider credentials with enterprise-grade security:Encryption & Storage
- Encrypted at rest in secure vaults
- Decrypted in-memory only during request processing
- Isolated workers handle decryption (never in your application)
- No exposure - credentials never appear in logs, responses, or UI
Key Rotation
- Update credentials without changing code
- Rotate keys in Model Catalog → Integrations
- All workspaces using that Integration automatically get the new key
- No downtime or code changes required
Multiple Credentials
- Store multiple credentials for the same provider
- Create different providers with different limits (dev, staging, prod)
- Use same underlying credentials with different governance rules
Using Providers in Your Code
There are three ways to specify providers. We recommend the model prefix format for clarity and simplicity.Method 1: Model Prefix (Recommended)
Specify provider and model together in themodel parameter. This keeps everything in one place and makes switching between providers/models simple.
Method 2: Provider Header
Specify provider separately using theprovider parameter. Remember to include the @ symbol.
Method 3: Legacy Virtual Key (Backwards Compatible)
Thevirtual_key parameter still works for backwards compatibility, but it’s not recommended for new code.
Recommendation: Use Method 1 (model prefix) - it’s explicit, keeps everything in one place, and makes switching between providers/models simple.
Using the Portkey SDK
Add the provider directly to the initialization configuration for Portkey.- NodeJS
- Python
- NodeJS SDK
- Python SDK
Using the OpenAI SDK
Add the provider directly to the initialization configuration for the OpenAI client.- NodeJS
- Python
Using alias with Azure virtual keys:
Self-Hosted LLM Virtual Keys
Portkey supports creating providers for your privately hosted LLMs, allowing you to manage them alongside commercial providers.- When adding a provider in Model Catalog, enable the “Local/Privately hosted provider” toggle
- Select the provider API specification your LLM implements (typically OpenAI)
- Enter your model’s base URL in the “Custom Host” field
- Add any required authentication headers and their values
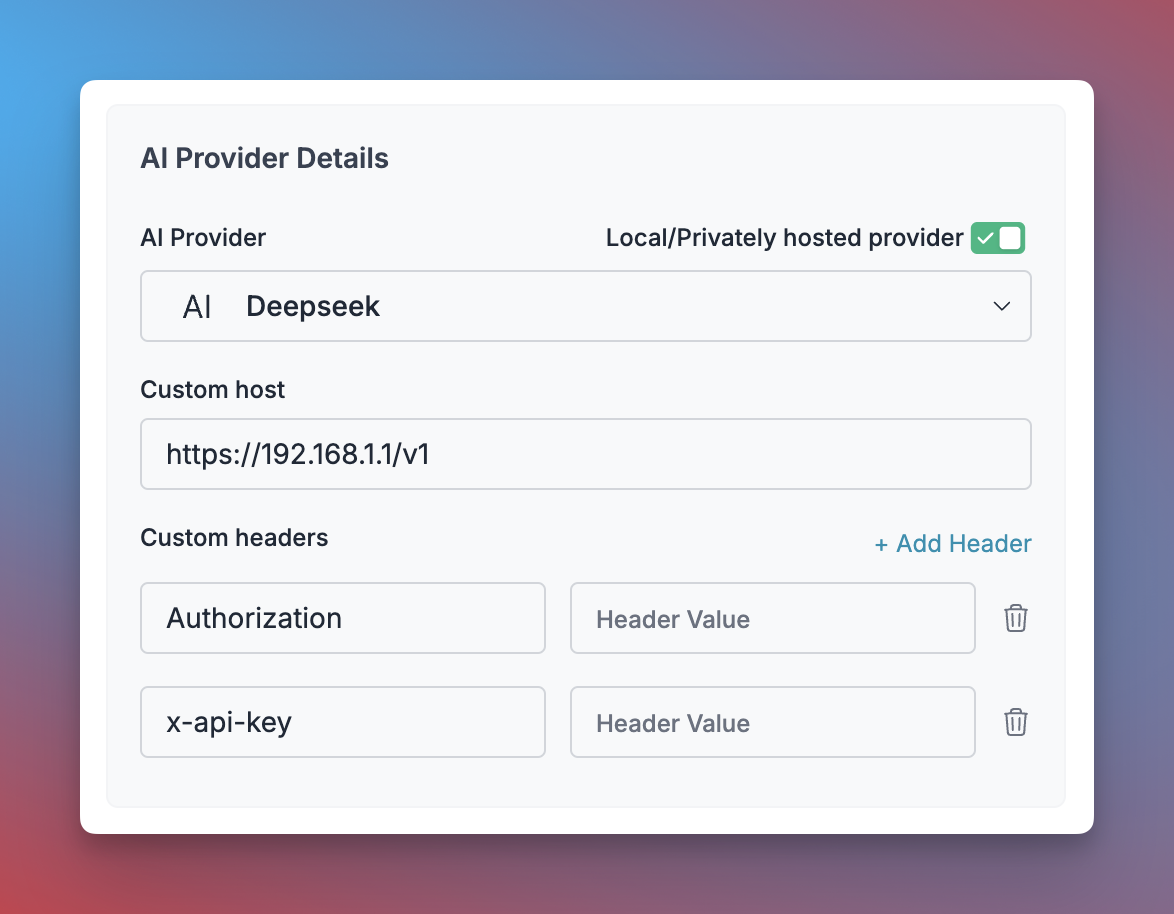
Configure Self-Hosted LLM
Using Providers in Configs
Configs also support three methods for specifying providers:Method 1: Model in override_params (Recommended)
Specify provider and model together inoverride_params. This works great with multi-provider strategies.
Method 2: Provider in Target
Specify provider directly in the target. Remember the@ symbol.
Method 3: Legacy virtual_key (Backwards Compatible)
Thevirtual_key field still works in configs.
Recommendation: Use Method 1 (model in override_params) - it’s explicit and works great with multi-provider strategies like fallback and load balancing.
Budget Limits
Set spending controls to prevent unexpected costs. Budget limits can be applied at the Integration level and cascade to all Providers created from it.Types of Budget Limits
Cost-Based Limits- Set maximum spend in USD (minimum $1)
- Automatically disables provider when limit reached
- Track spending in real-time
- Set maximum tokens consumed (minimum 100 tokens)
- Control usage independent of cost fluctuations
- Track both input and output tokens
Setting Budget Limits
At Integration Level:- Go to Integrations → Select Integration
- Navigate to Workspace Provisioning
- Click Edit Budget & Rate Limits for each workspace
- Set cost-based or token-based limits
- Different budgets for different workspaces
- Finance team: $500/month
- Engineering team: $2000/month
- Marketing team: $300/month
Alert Thresholds
Set notifications before reaching limits:- Cost-based: Alert at 80% of budget (e.g., 500)
- Token-based: Alert at 90% of token limit
- Email notifications sent automatically
- Continue using until full limit reached
Periodic Resets
Configure automatic budget resets:- No Reset: Budget applies until exhausted
- Weekly Reset: Resets every Sunday at 12 AM UTC
- Monthly Reset: Resets on 1st of month at 12 AM UTC
Budget limits cannot be edited once set. To change a limit, duplicate the provider and create a new one with the desired limit.
Budget Limits Guide
Detailed guide to setting and managing budget limits
Rate Limits
Control request velocity to manage load, prevent abuse, and ensure fair resource distribution.Types of Rate Limits
Request-Based Limits- Maximum requests per time period
- Example: 1000 requests/minute
- Prevents API abuse and DoS attacks
- Maximum tokens consumed per time period
- Example: 1M tokens/hour
- Controls usage independent of request count
Time Windows
Choose from three intervals:- Per Minute: Fine-grained control, resets every minute
- Per Hour: Balanced control, resets hourly
- Per Day: Broad control, resets daily
Setting Rate Limits
At Integration Level:- Go to Integrations → Select Integration
- Navigate to Workspace Provisioning
- Click Edit Budget & Rate Limits
- Set request-based or token-based rate limits
- Choose time window (minute/hour/day)
- Engineering workspace: 5000 requests/hour
- Finance workspace: 1000 requests/day
- Marketing workspace: 200 requests/minute
Exceeding Rate Limits
When a rate limit is reached:- Subsequent requests rejected with error code
- Clear error message indicating limit exceeded
- Limit automatically resets after time period
- No manual intervention needed
Rate Limits Guide
Detailed guide to setting and managing rate limits
Model Access Control
Control which models users and workspaces can access through multiple layers of governance.Model Provisioning (Integration Level)
When creating an Integration, specify which models are available: Allow All Models- Provides access to all models from that provider
- Useful for development or when you trust the team
- Less control over costs
- Create an explicit allow-list of approved models
- Only selected models appear in workspace Model Catalog
- Better cost control and compliance
- Production Integration: Only
gpt-4o,gpt-4o-mini - Development Integration: All GPT models
- Research Integration: Experimental models only
Workspace-Level Access
Control access at the workspace level:-
Provision Integrations to Workspaces
- Choose which workspaces can use which Integrations
- Each workspace sees only provisioned providers
- Instant access revocation
-
Workspace-Specific Model Lists
- Override Integration model list per workspace
- Finance workspace: Only cost-effective models
- Engineering workspace: All models for experimentation
User-Level Access (API Keys)
Control access through API key permissions: Model Catalog Permissions:- Disabled: Cannot access Model Catalog
- Read: Can view providers and models
- Write: Can create/edit providers
- Delete: Can remove providers
- Developer API key: Read access to Model Catalog
- Admin API key: Write/Delete access
- Service account: Read access to specific providers only
Model Whitelist Guardrail
Use the Model Whitelist guardrail to enforce model restrictions at the request level: How it works:- Check if the model in the request is in the allowed list
- Block requests to unapproved models
- Works as an input guardrail (before request is sent)
- Enforce model restrictions per API key
- Prevent accidental use of expensive models
- Compliance requirements
Guardrails
Learn about all guardrail options including Model Whitelist
Model Rules Guardrail
Coming Soon: Model Rules guardrail provides advanced model access control. More details will be added here once the feature documentation is available.If you have information about Model Rules, please share it and we’ll update this section.
- User roles and permissions
- Request metadata
- Dynamic model allow-lists
- Context-aware access control
Azure Virtual Keys
Azure Virtual Keys allow you to manage multiple Azure deployments under a single provider. This feature simplifies API key management and enables flexible usage of different Azure OpenAI models. You can create multiple deployments under the same resource group and manage them using a single provider.
Configure Multiple Azure Deployments
alias of the deployment as the model in LLM request body. In case the models is left empty or the specified alias does not exist, the default deployment is used.
Prompt Templates
Choose your Provider within Portkey’s prompt templates, and it will be automatically retrieved and ready for use.Langchain / LlamaIndex
Set the provider when utilizing Portkey’s custom LLM as shown below:Quick Reference: Virtual Keys Concept
The Core Concept (Still True):- ✅ One Portkey API key → Access multiple providers → Use hundreds of models
- ✅ Provider credentials stored securely, never exposed in code
- ✅ Centralized management and governance
| Old Virtual Keys Feature | New Model Catalog System |
|---|---|
| Create Virtual Key in workspace | Add Provider in Model Catalog |
| Always enter API keys | Choose existing credentials or create new |
virtual_key header | model="@provider/model" format (recommended) |
| Budget per virtual key | Budget per workspace (from Integration) |
| All models accessible | Model allow-list per Integration |
| Workspace-only | Org-level sharing + workspace-level |